Thursday, January 26, 2017

Android Application best performance improvement tips

Recently I got chance to work on ongoing project. which means I had to continue working on code written by other developers. so I had to understand code so I can start working on my part.
After looking at code I realized that code is poorly written and it has several performance related issues in layout files and java classes. so I started making list of all issues I noticed in Code so I can share with other developers(already working on project) and we can improve our Android Application.
Some friends/colleagues asked me how you were able to identify so many issues in code so I though I will write an article on this.
Some points which I shared with other members in first code review.
  • Application shared preferences need to be singleton (Currently creating new objects every time in each class)
  • Fire base analytics need to be initialized once. (same as above)
  • supportsRtl was set to false in manifest file (They had to add support for Right to left layouts,But they added static files for each language. 1 file for English, 1 layout file for Arabic)
  • Use of inner classes for AsyncTask
  • No exception Handling
  • No run time checks with implicit Intents
  • Too many static Application objects.

You can study further why above mentioned points are bad practices/discouraged.
After above phase I noticed that some layouts are taking time while rendering even without any network call. surely performance issue agree ? Than I decided that I have to identify more issues in code and have to improve Application.
Than I started working on memory monitoring using:
  • Android studio memory profiling (Heap Dump)
  • Leak Canary
And identified activities which are leaking memory. and shared my findings with team members so they can also learn and not repeat these mistakes in future.
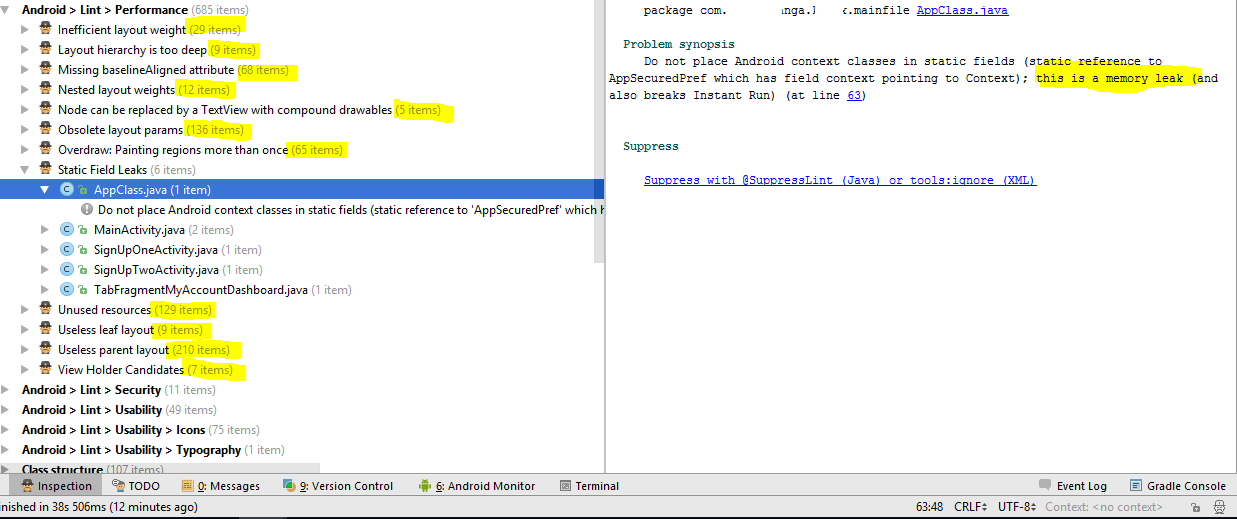
I am sure still there are many performance issues in Application, so I decided to take advantage of Lint.
Go to Toolbar in Android Studio and Under Analyze section click Inspect Code.
I am still looking for performance issues in our Application because I want to make it best Application. Still I have not started working on my part. fixing issues in code :)
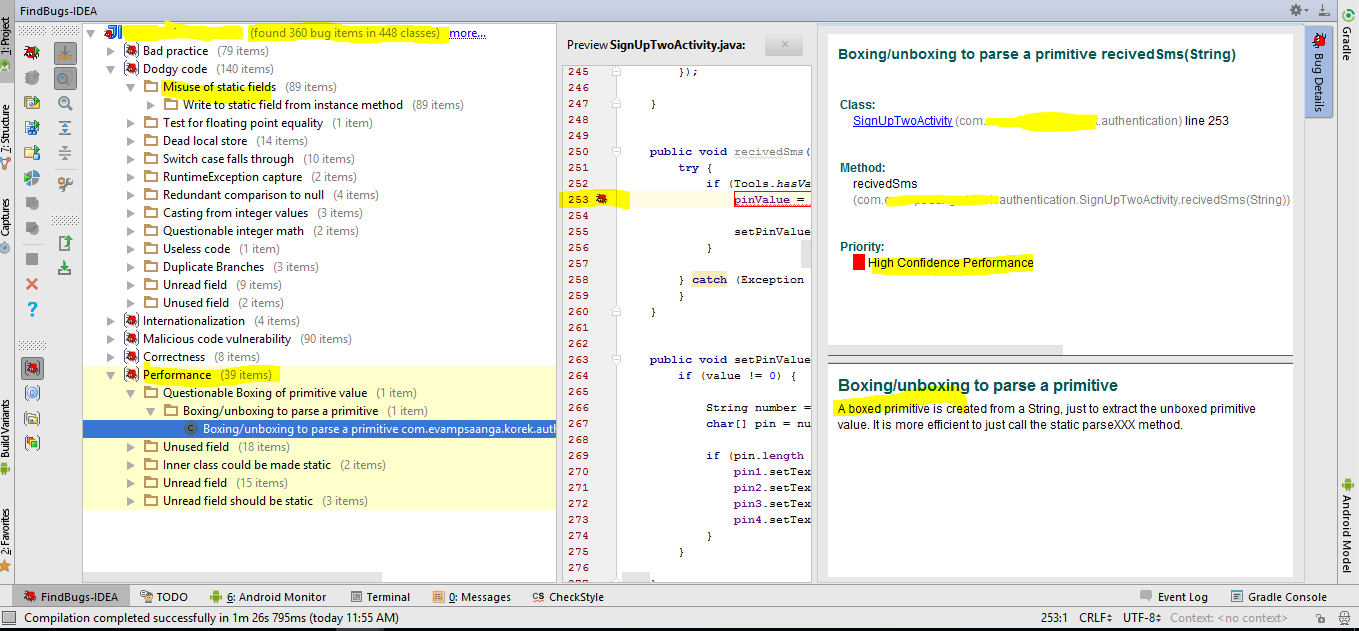
Than I installed a plugin “Find Bugs-IDEA” in Android studio and analyzed code using Find Bugs. this is how its result looks like.
After fixing all of the above issues plus memory leaks. I am now confident that we have followed standards to some extent and our code is much optimized now.
Happy Coding :)
Please ignore Grammar and Punctuation mistakes. English is not my native language :)
Hammad Tariq
Android Developer

Thursday, January 19, 2017

Configure Git Remote Repository

As our company started using Git instead of SVN. and my Manager has asked me to help other developers who are left with Git Configuration on their development machines. so I though I should write a blog post and list steps involved.

Let suppose below are your credentials
GIT IP : XX.XXX.XXX.XX
Remote repository URL: /home/git/customers/xyz/xyzproject/android
Git User name: hammad.tariq
password: xyzpass

Now I assume you have GIT installed.

Step 1:
Go to your project source code folder right click and select Git Bash here
Git interface will be opened.

Step 2:
Now you have local repository(folder) and you need to clone it with remote repository.
(your local repository will be copy of remote repository, your code pulled from remote will be saved in local and code in local will be pushed to remote repository).

First Command 
git clone ssh://hammad.tariq@XX.XXX.XXX.XX/home/git/customers/xyz/xyzproject/android

-If you have entered valid information it will prompt you for password.
-If there is already code on that repository, another developer has pushed already. This command will pull that code and will save into your local repository.

This will be printed on console if everything fine.
Cloning into 'android'...

Step 3:
If there is no code in your local repository copy paste code into your local repository so you can push it into remote repository.

Second Command
git add -A

Third Command
git status

Fourth Command
git commit -a -m "First Commit version 1.0.1"


Fifth Command
git push origin master


Now it will start pushing code.

If you get errors like below:

1- Error
fatal: failed to write object
error: unpack failed: unpack-objects abnormal exit

Solution: Than you don't have write permission for specified repository.

2- Error
! [rejected]        master -> master (fetch first)
error: failed to push some refs to 'https://hammadtariq@bitbucket.org/hammadtariq/xyz.git'
hint: Updates were rejected because the remote contains work that you do
hint: not have locally. This is usually caused by another repository pushing
hint: to the same ref. You may want to first integrate the remote changes
hint: (e.g., 'git pull ...') before pushing again.

hint: See the 'Note about fast-forwards' in 'git push --help' for details.


Solution: You are doing "git push origin master", You need to run "git pull" first.


3- Error
remote: error: refusing to update checked out branch: refs/heads/master
remote: error: By default, updating the current branch in a non-bare repository
remote: error: is denied, because it will make the index and work tree inconsistent
remote: error: with what you pushed, and will require 'git reset --hard' to match
remote: error: the work tree to HEAD.
remote: error:
remote: error: You can set 'receive.denyCurrentBranch' configuration variable to
remote: error: 'ignore' or 'warn' in the remote repository to allow pushing into
remote: error: its current branch; however, this is not recommended unless you
remote: error: arranged to update its work tree to match what you pushed in some
remote: error: other way.
remote: error:
remote: error: To squelch this message and still keep the default behaviour, set

remote: error: 'receive.denyCurrentBranch' configuration variable to 'refuse'.

Solution: 
git config receive.denyCurrentBranch ignore
run this command and try to push code again
Note: You need to run this command from server. (Git IP)


Kotlin Android MVP Dagger 2 Retrofit Tutorial

http://developine.com/building-android-mvp-app-in-kotlin-using-dagger-retrofit/