e.g in image below where notification has two options confirm or cancel and you want to check if user has canceled or confirmed without launching application. Than follow this tutorial.private void sendNotification(String messageBody) { Intent intent = new Intent(this, SplashActivity.class); intent.putExtra("fromNotification", "book_ride"); intent.addFlags(Intent.FLAG_ACTIVITY_CLEAR_TOP); Intent intentConfirm = new Intent(this, NotificationActionReceiver.class); intentConfirm.setAction("CONFIRM"); intentConfirm.addFlags(Intent.FLAG_ACTIVITY_CLEAR_TOP); Intent intentCancel = new Intent(this, NotificationActionReceiver.class); intentCancel.setAction("CANCEL"); intentCancel.addFlags(Intent.FLAG_ACTIVITY_CLEAR_TOP); //This Intent will be called when Notification will be clicked by user. PendingIntent pendingIntent = PendingIntent.getActivity(this, 0 /* Request code */, intent, PendingIntent.FLAG_ONE_SHOT); //This Intent will be called when Confirm button from notification will be //clicked by user. PendingIntent pendingIntentConfirm = PendingIntent.getBroadcast(this, 0, intentConfirm, PendingIntent.FLAG_CANCEL_CURRENT); //This Intent will be called when Cancel button from notification will be //clicked by user. PendingIntent pendingIntentCancel = PendingIntent.getBroadcast(this, 1, intentCancel, PendingIntent.FLAG_CANCEL_CURRENT); Uri defaultSoundUri = RingtoneManager.getDefaultUri(RingtoneManager.TYPE_NOTIFICATION); NotificationCompat.Builder notificationBuilder = new NotificationCompat.Builder(this) .setSmallIcon(R.drawable.logo_steer) .setContentTitle("Madaar Ride") .setContentText("" + messageBody) .setAutoCancel(true) .setSound(defaultSoundUri) .setContentIntent(pendingIntent); notificationBuilder.addAction(R.drawable.ic_check_black, "Confirm", pendingIntentConfirm); notificationBuilder.addAction(R.drawable.ic_clear_black, "Cancel", pendingIntentCancel); NotificationManager notificationManager = (NotificationManager) getSystemService(Context.NOTIFICATION_SERVICE); notificationManager.notify(11111 /* ID of notification */, notificationBuilder.build()); }Step 2: Now Declare BroadcastReceiver for handling action events in manifest file.<receiver android:name="NotificationActionReceiver"> <intent-filter> <action android:name="CONFIRM" /> <action android:name="CANCEL" /> </intent-filter> </receiver>Step 3: Add code for BroadcastReceiver ClassAuthor:/** * Created by hammadtariq on 8/9/2016. */ public class NotificationActionReceiver extends BroadcastReceiver { @Override public void onReceive(Context context, Intent intent) { if (intent.getAction().equalsIgnoreCase("CONFIRM")) { Toast.makeText(context, "Booking your ride", Toast.LENGTH_SHORT).show(); } else if (intent.getAction().equalsIgnoreCase("CANCEL")) { NotificationManager notificationManager = (NotificationManager) context.getSystemService(Context.NOTIFICATION_SERVICE); notificationManager.cancel(11111); } } }Hammad TariqAndroid Application Developer
Thursday, October 20, 2016
android notification action button listener

Tuesday, July 5, 2016
Processing Bitmap and Memory Management in Android
Hi, in this Blog post I will explain how to deal with bitmaps in Android and avoid memory leaks and out of memory errors. I will give you some tips on how you can use low memory and can get same results.
First of all let me add some points why your Application can crash due to out of memory error when you are dealing with bitmaps in your Android Application.
1. In Android operating system every application has specific memory limit which can be assigned to it, so that its code can execute in that available memory. it is usually 16MB for most of devices.
And if you are processing larger bitmap say 5MP photo. Memory required for decoding this bitmap is 2592*1936*4 is 19MB (Value 4 is color channel, will explain below). out of memory error, without doing any important, long running task :(
2 . You are loading multiple bitmaps at once for displaying in list view, grid view and view pager.
And you are trying to allocate more space than available heap.
Please note dalvik do not merge free memory blocks automatically. for example you have 5MB free space and you need 2MB but you still get out of memory error because there is memory leak. you do not have 2MB available space in a single block.
3. There could be memory leak if Object cannot be garbage collected. Why an object cannot be garbage collected. I will explain below,
Now here are tips which you can follow and can avoid out of memory exception in your Android Application.
1. Always use Activity context instead of Application context. because Application context cannot be garbage collected. And release resources as your activity finishes. (life cycle of object should be
same as of activity).
2 . When Activity finishes. Check HEAP DUMP (memory analysis tool in Android studio).
If there are objects in HEAP DUMP from finished activity there is memory leak. review your
code and identify what is causing memory leak.
3. Always use inSampleSize
Now what is inSampleSize ?
with the help of inSampleSize you are actually telling the decoder not to grab every pixel in memory, instead sub sample image.
This will cause less number of pixels to be loaded in memory than the original image. you can tell decoder to grab every 4th pixel or every second pixel from original image.
if inSampleSize is 4. decoder will return an Image that is 1/16 the number of pixels in original image.
so how much memory you have saved ? calculate :)
4. Read Bitmap Dimensions before loading into memory.
How reading bitmap dimensions before loading image into memory can help you avoid out of
memory error ? Let's Learn
use inJustBounds = true
here is technique with the help of which you can get image dimension beore loading it in memory
BitmapFactory.Options options = new BitmapFactory.Options();
options.inJustDecodeBounds = true;
Bitmap bitmap = BitmapFactory.decodeResource(getResources(), R.id.myimage, options);
int imageHeight = options.outHeight;
int imageWidth = options.outWidth;
String imageType = options.outMimeType;
Above code snippet will not give us any image/bitmap. it will return null for bitmap Object.
but it will definitely return width and height of that image. which is R.id.myimage.
Now you have width and height of Image. you can scale up or scale down image based on these factors:
- ImageView size which will be used to display Image.
- Available amount of memory. you can check available amount of memory using ActivityManager and getMemoryClass.
- Screen size and density of device.
5. Use appropriate Bitmap Configuration
Bitmap configurations is color space/color depth of an Image. Default bitmap Configuration in Android is RGB_8888 which is 4 bytes per pixel.
If you use RGB_565 color channel which use 2 Bytes per pixel. half the memory allocation for same resolution :)
6. Use inBitmap property for recycling purpose.
7. Do not make static Drawable Object as it cannot be garbage collected.
8. Request large heap in <application> in manifest file.
9. Use multiple processes if you are doing lot of image processing(memory intensive task) or use NDK (Native Development using c, c++)
Author:
Hammad Tariq
Android Developer
Thursday, June 23, 2016
AES Encryption Decryption in Android
This is the easiest way of implementing AES Encryption and Decryption in Android.
import javax.crypto.Cipher;
 import javax.crypto.SecretKey;
 import javax.crypto.spec.SecretKeySpec;

public class AESEncryptionDecryption {

private static final byte[] keyValue =
        new byte[]{'c', 'o', 'd', 'i', 'n', 'g', 'a', 'f', 'f', 'a', 'i', 'r', 's', 'c', 'o', 'm'};


public static String encrypt(String cleartext)
        throws Exception {
    byte[] rawKey = getRawKey();
    byte[] result = encrypt(rawKey, cleartext.getBytes());
    return toHex(result);
}

public static String decrypt(String encrypted)
        throws Exception {

    byte[] enc = toByte(encrypted);
    byte[] result = decrypt(enc);
    return new String(result);
}

private static byte[] getRawKey() throws Exception {
    SecretKey key = new SecretKeySpec(keyValue, "AES");
    byte[] raw = key.getEncoded();
    return raw;
}

private static byte[] encrypt(byte[] raw, byte[] clear) throws Exception {
    SecretKey skeySpec = new SecretKeySpec(raw, "AES");
    Cipher cipher = Cipher.getInstance("AES");
    cipher.init(Cipher.ENCRYPT_MODE, skeySpec);
    byte[] encrypted = cipher.doFinal(clear);
    return encrypted;
}

private static byte[] decrypt(byte[] encrypted)
        throws Exception {
    SecretKey skeySpec = new SecretKeySpec(keyValue, "AES");
    Cipher cipher = Cipher.getInstance("AES");
    cipher.init(Cipher.DECRYPT_MODE, skeySpec);
    byte[] decrypted = cipher.doFinal(encrypted);
    return decrypted;
}

public static byte[] toByte(String hexString) {
    int len = hexString.length() / 2;
    byte[] result = new byte[len];
    for (int i = 0; i < len; i++)
        result[i] = Integer.valueOf(hexString.substring(2 * i, 2 * i + 2),
                16).byteValue();
    return result;
}

public static String toHex(byte[] buf) {
    if (buf == null)
        return "";
    StringBuffer result = new StringBuffer(2 * buf.length);
    for (int i = 0; i < buf.length; i++) {
        appendHex(result, buf[i]);
    }
    return result.toString();
}

private final static String HEX = "0123456789ABCDEF";

private static void appendHex(StringBuffer sb, byte b) {
    sb.append(HEX.charAt((b >> 4) & 0x0f)).append(HEX.charAt(b & 0x0f));
}
String encrypted = ""; try { encrypted = AESEncryptionDecryption.encrypt(plain_text); Log.d(Constants.firebase_app, "encrypted:" + encrypted); } catch (Exception e) { e.printStackTrace(); }*********************************************************************String decrypted = ""; try { decrypted = AESEncryptionDecryption.decrypt(encrypted); Log.d(Constants.firebase_app, "decrypted:" + decrypted); } catch (Exception e) { e.printStackTrace(); }
Author:Hammad TariqAndroid Developer
Monday, June 20, 2016
Allatori obfuscator android mapping file location
If you are using Allatori for obfuscation and want to get non obfuscated stack track in crash reporting or your app logs than use mapping files generataed by Allatori during obfuscation.
From following address
Project\AppName\build\intermediates\classes\allatori-log-debug.xml
Project\AppName\app\build\intermediates\classes\allatori-log-release.xml
Use stack trace utility and stack trace and mapping file from above location
to get non obfuscated stack trace. so that you can fix issues :)
Author:

Hammad Tariq

Android Developer
Project\AppName\app\build\intermediates\classes\allatori-log-release.xml
Use stack trace utility and stack trace and mapping file from above location
to get non obfuscated stack trace. so that you can fix issues :)
Author:
Hammad Tariq
Android Developer
Friday, June 17, 2016
How to Convert Drawable to Bitmap in Android
In this tutorial I will explain how to read Drawable from resources as Bitmap and than I will write down some common techniques for processing Bitmaps.
public final static Integer[] imageResIds = new Integer[]{
R.drawable.a, R.drawable.b, R.drawable.c,
R.drawable.d, R.drawable.e, R.drawable.f,
R.drawable.k, R.drawable.l, R.drawable.m};
loadBitmap(imageResIds[index], mImageView);
public void loadBitmap(int resId, ImageView imageView) {
//Now we have bitmap object from drawable resource. we can scale this bitmap
//according to device screen density.
Bitmap bitmap = BitmapFactory.decodeResource(getResources(), data);
}
Note: This method can cause out of memory error.
- If you want to avoid this exception use scaled down version of bitmap in memory.
- Process Bitmaps Off the UI thread (Use Async Task).
Author:
Hammad Tariq
Android Developer
Note: This method can cause out of memory error.
- If you want to avoid this exception use scaled down version of bitmap in memory.
- Process Bitmaps Off the UI thread (Use Async Task).
Author:
Hammad Tariq
Android Developer
Subscribe to:
Posts (Atom)
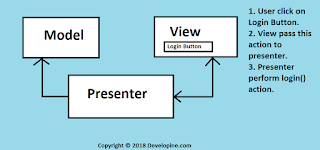
Kotlin Android MVP Dagger 2 Retrofit Tutorial
http://developine.com/building-android-mvp-app-in-kotlin-using-dagger-retrofit/
-
 Hi In this post I will add example code for how to add actions in your local notification and than add their click listener. e.g in image...
 -
In this example I will show you how to get precise call state in Android programatically using java reflection API. Add this in Andro...
-
 Hello Guys, Now I have my own Blog Site . please visit Link for more Android and Kotlin Tutorials. In this example I will teach yo...